Imagine you’re on a serene camping trip, ready to unwind in your cozy RV. The last thing you want is to discover water pooling around your feet, revealing that your RV water heater is leaking from the bottom.
It’s not just an inconvenience; it can disrupt your entire adventure. If you’ve noticed this issue, you’re not alone, and it’s crucial to address it swiftly to avoid further damage.
Your RV is your home on wheels, and ensuring its components function correctly is key to a stress-free journey.
A leaking water heater not only affects your comfort but can also lead to costly repairs if ignored.
This article will guide you through the common causes of this problem and the steps you can take to fix it. Imagine the peace of mind you’ll feel once the issue is resolved, knowing you can focus on creating unforgettable memories on the road.
Identifying The Leak Source Of RV Water Heater Leaking
Identifying the source of a leak in an RV water heater is crucial. Examine connections and seals for any signs of damage. Regular checks can prevent costly repairs and ensure efficient heater performance.
Identifying the source of a leak in your RV water heater can save you from unnecessary stress and costly repairs.
Many RV owners face this issue, but not everyone knows how to pinpoint the exact problem. With a keen eye and a few simple steps, you can find the leak source and tackle it head-on.
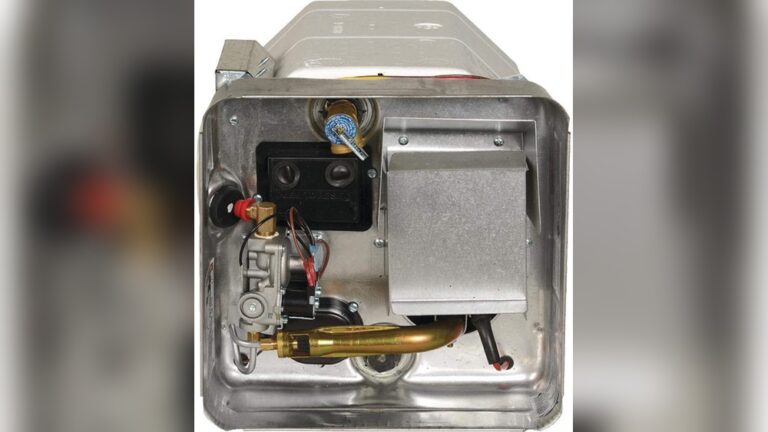
#1. Visual Inspection
Start by giving your water heater a thorough visual inspection. Look around the bottom for any obvious signs of water pooling or dampness. You might notice rust or mineral deposits, which can indicate a slow leak over time.
#2. Check Connections
Inspect all the connections leading to and from your water heater. Loose or corroded fittings can often cause leaks. Tighten any loose connections with a wrench, but ensure not to over-tighten as this can cause further damage.
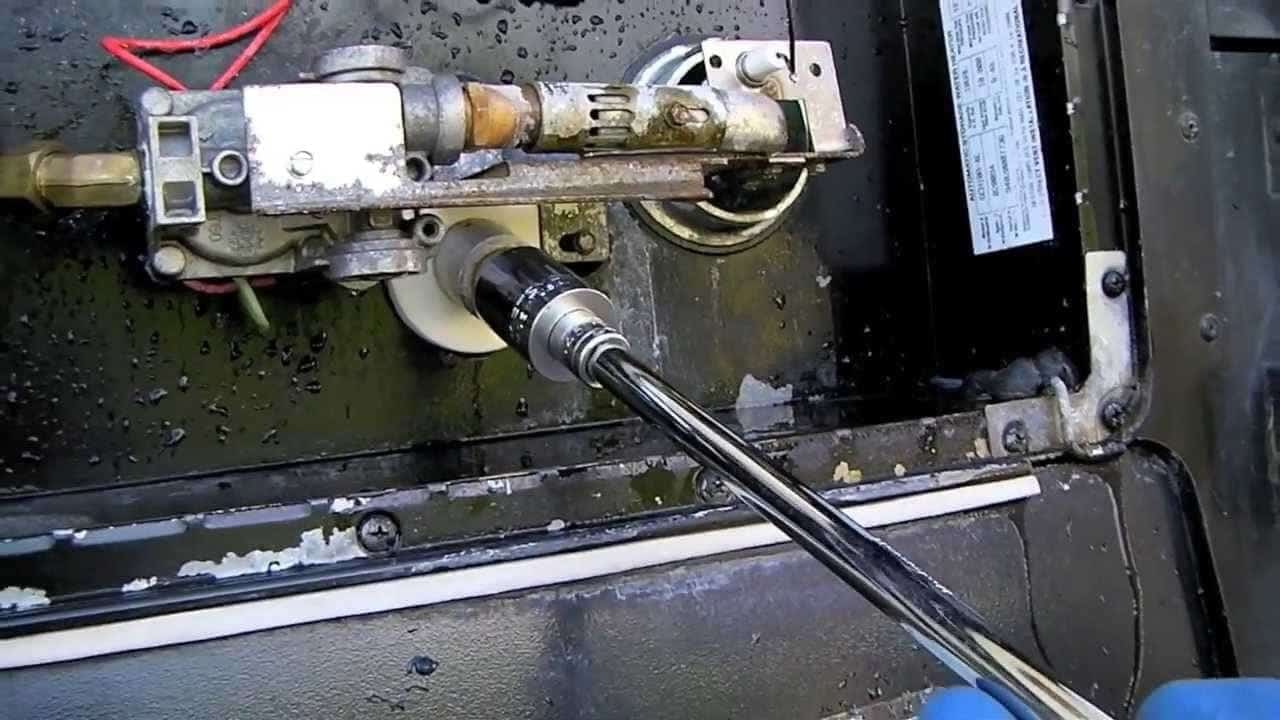
#3. Examine The Pressure Relief Valve
The pressure relief valve is a common culprit for leaks. Test it by gently lifting the lever and letting it snap back. If water continues to drip afterward, the valve might need replacing.
#4. Inspect The Tank
A leaky tank can be a serious issue. Look for any cracks or holes in the tank itself. If the tank is damaged, a replacement might be your only option.
#5. Monitor For Condensation
Sometimes, what appears to be a leak might just be condensation. If your RV is in a humid environment, this could be the case. Dry the area and check back after running the heater to see if it reappears.
#6. Use A Moisture Meter
For a more precise diagnosis, you might consider using a moisture meter. This tool can detect moisture levels in different parts of the heater, helping you pinpoint less obvious leaks.
#7. Consult Your Rv Manual
Your RV manual can be a valuable resource. It may contain specific troubleshooting tips for your model.
Familiarize yourself with the components of your water heater as described in the manual. Identifying the leak source early can prevent further damage. Have you ever faced a leak in your RV water heater?
What techniques helped you resolve it? Engaging with your RV’s maintenance not only extends its life but also enhances your travel experience.
Credit: www.thervgeeks.com
Safety Precautions
Ensuring safety is crucial when dealing with an RV water heater leaking from the bottom. Such leaks can lead to potential hazards if not addressed properly. Understanding and implementing safety measures can prevent accidents and protect your RV.
Check For Gas Leaks
First, ensure there are no gas leaks around the water heater. Gas leaks can be dangerous. Use a gas detector to check for any issues. If a gas leak is detected, evacuate the area immediately and seek professional help.
Turn Off Power Supply
Before inspecting the water heater, turn off its power supply. This step prevents electrical hazards. Locate the circuit breaker and switch it off. Safety should always be the priority.
Drain The Water Heater
Draining the water heater is necessary to prevent further leakage. Use a hose to drain water safely. Ensure you dispose of the water in a safe area away from electrical components.
Wear Protective Gear
Wearing protective gear is essential during inspection. Gloves protect your hands from sharp edges. Safety goggles shield your eyes from debris. Proper attire ensures personal safety.
Inspect For Structural Damage
Look for any structural damage around the water heater. Cracks or breaks can worsen leaks. Identifying these issues early can prevent further complications.
Seek Professional Assistance
If unsure about handling the leak, consult a professional. Trained technicians have the expertise to address water heater issues safely. Professional help ensures a thorough inspection and repair.
Tools And Materials Required
Fixing a leaking RV water heater is not difficult. You need the right tools and materials. Preparing these items can save time and effort.
Tools Needed
A wrench is essential for loosening and tightening connections. A screwdriver will help remove panels and screws. You will need pliers for gripping and holding parts.
Safety Gear
Safety glasses protect your eyes from splashes. Gloves keep your hands safe from sharp edges. Wear a mask to avoid inhaling any fumes.
Materials Required
Get a new gasket or seal to replace the old one. Leak sealant can fix small leaks quickly. Have a towel ready to clean spills and drips.
Additional Supplies
Keep a flashlight handy for better visibility. A bucket will catch excess water during repairs. Tape can temporarily hold parts in place.
Preparation Tips
Organize your tools and materials before starting. Check the RV manual for specific instructions. Clear the area around the water heater for easy access.

Credit: www.gntos.org
Shutting Off Water Supply
Discovering a leak at the bottom of your RV water heater can be frustrating. Acting swiftly is essential to prevent further damage. The first step in managing this issue is shutting off the water supply. Doing this stops water flow, allowing you to assess and address the problem.
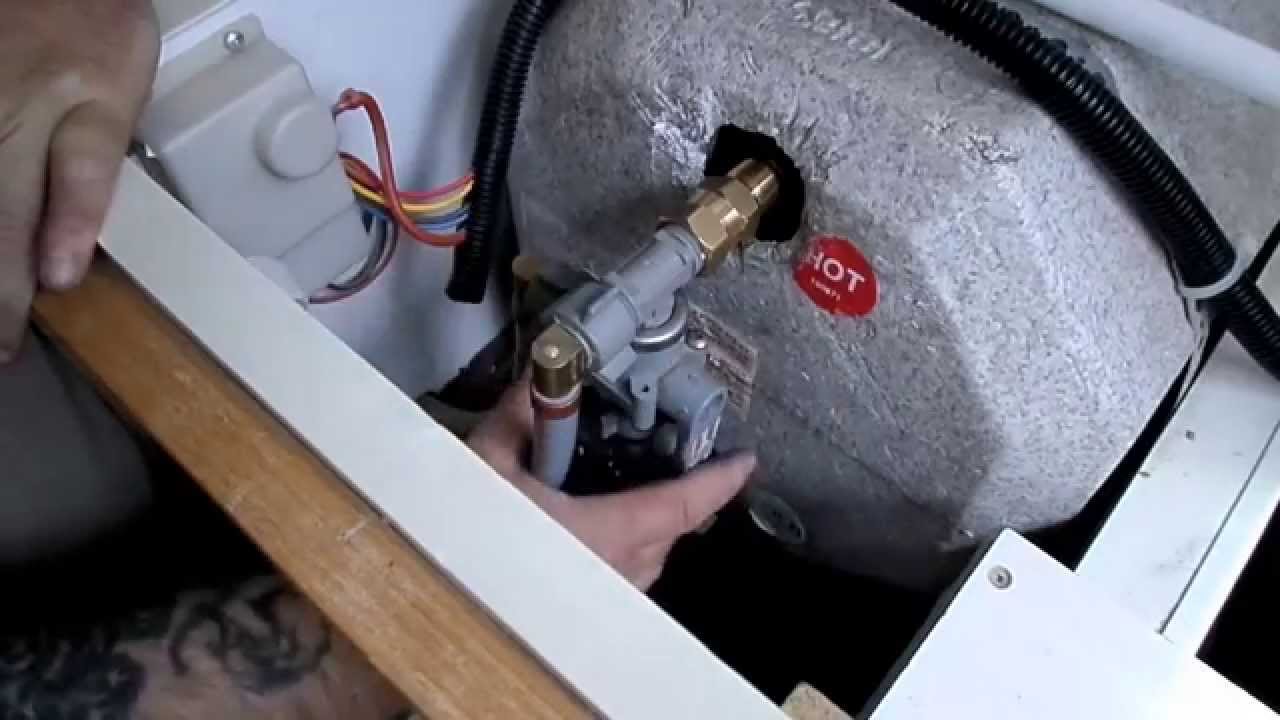
How To Locate The Water Supply Valve
Find the water supply valve near the water heater. Typically, it’s a small lever or knob. It’s often in the compartment where the heater is installed. If you can’t find it, refer to the RV’s manual. This guide usually has diagrams to help.
Steps To Turn Off The Water Supply
Once the valve is found, turn it clockwise. This action shuts off the water. Make sure to turn it fully to stop the flow completely. It’s crucial to check if the water has stopped. Turn on a nearby tap to ensure no water comes out.
Importance Of Shutting Off The Water Supply
Stopping the water supply is vital to prevent flooding. It also protects other RV components from water damage. Without this step, repairs could become more costly. Taking immediate action helps in managing the leak effectively.
What To Do After Shutting Off The Water
With the water supply off, examine the heater. Look for visible damage or worn-out parts. It’s important to address these promptly. Consider contacting a professional if needed. Their expertise ensures thorough repairs and safety.
Draining The Water Heater
Experiencing an RV water heater leaking from the bottom? Draining the water heater helps identify the issue and prevents further damage. Regular maintenance is crucial to avoid costly repairs and ensure a safe journey.
Draining the water heater is an essential step when dealing with a leak from the bottom of your RV water heater.
Imagine you’re on a peaceful camping trip, only to discover a puddle forming underneath your heater. Before you panic, remember that draining the water heater can help identify the root cause of the problem and prevent further water damage.
This task might sound daunting, but with a bit of guidance, you’ll find it’s a manageable and rewarding process. Let’s dive into how you can do it efficiently.
Preparation And Safety Measures
Before you begin, ensure your safety by turning off the power supply to the water heater. This can be done by switching off the breaker in your RV’s electrical panel. Don’t forget to let the water cool down to avoid burns. A pair of gloves and safety goggles might also come in handy.
Locate The Drain Valve
Find the drain valve, usually located at the bottom of the water heater. It’s a small spigot that allows water to be released. Have you ever noticed how some tasks in RV maintenance become easier once you know exactly where things are? This is one of those instances.
Attach A Hose
To avoid flooding your RV, connect a garden hose to the drain valve. You can direct the hose to a safe drainage area. This prevents water from pooling around your RV, keeping your campsite tidy. Isn’t it satisfying to see the water flow safely away instead of creating a mess?
Open The Drain Valve
Carefully turn the valve counterclockwise to release the water. You might hear a gurgling sound as air enters the tank, allowing water to flow out. It’s as if the heater is finally taking a deep breath after holding onto all that water. Watch as the tank empties, feeling a sense of accomplishment.
Monitor The Drainage
Keep an eye on the water as it drains. Does it look clear or rusty? This observation can provide clues about the state of your heater. If the water appears discolored, it might indicate sediment build-up, which needs attention.
Close The Valve And Disconnect The Hose
Once the tank is empty, close the valve securely and disconnect the hose. You’ve completed a significant step in tackling that pesky leak. Take a moment to appreciate your handiwork—it’s not every day you tackle RV maintenance with such finesse. Draining your RV water heater is more than just a maintenance task; it’s a proactive way to ensure your trips remain enjoyable and stress-free. Have you ever found yourself in a situation where preparation saved you from a potential disaster? This is one of those moments.
Inspecting For Damage
Inspecting for damage in an RV water heater is crucial when leaking from the bottom. Check for cracks or corrosion, and ensure all connections are tight. Regular maintenance can prevent water damage and costly repairs.
Inspecting for damage in your RV water heater may seem like a daunting task, but it’s crucial. Identifying the source of a leak can save you time and money.
Plus, it helps prevent further damage. Imagine being on a road trip, only to find your water heater’s leaking. You’d want to fix it quickly, right? Here’s how you can spot potential issues.
Checking Valves and Fittings Start by examining the valves and fittings. These are often the culprits behind leaks. Ensure all valves are tightly closed and check for any signs of corrosion or rust.
A leaky valve might be due to loose fittings or wear and tear. Have you ever noticed water pooling under your heater? It might be a sign of faulty fittings.
Look for any loose connections or worn-out seals. Tighten any loose parts you find, and consider replacing old, damaged fittings.
Examining the Tank The tank itself is another area to inspect. Look for cracks or splits along the surface. Even minor fractures can lead to significant leaks.
Use a flashlight to spot any hidden damage. Does the tank feel unusually hot to the touch? It could indicate overheating, which sometimes results in leaks.
Check the tank’s exterior for any discoloration or bubbling paint. These can be signs of internal issues needing immediate attention. Remember, a thorough inspection can prevent bigger problems down the road.
Have you ever had a small issue snowball into a costly repair? Avoid this with regular checks. What steps will you take to ensure your RV water heater remains in top condition?
Repairing Minor Leaks
Experiencing a water heater leak from the bottom of your RV? This issue often points to a loose drain valve or failing gasket.
Addressing it early can prevent costly damage and ensure your RV remains in top condition. Regular inspections and timely repairs keep your adventures hassle-free.
When your RV water heater starts leaking from the bottom, it can feel like the sky is falling. But don’t worry. Often, the issue is a minor leak that you can fix yourself. Repairing minor leaks not only saves you money, it also keeps your RV trips running smoothly. Let’s dive into two straightforward solutions: tightening connections and replacing faulty parts.
Tightening Connections
The first step in addressing a leak is to check the connections. Sometimes, all it takes is a simple twist. Inspect the inlet and outlet connections for any signs of water seepage. Use a wrench to gently tighten any loose fittings, but be careful not to over-tighten.
Have you ever found that a loose garden hose connection was the culprit behind a backyard flood? The same logic applies here. Tightening a connection often stops the leak, saving you a trip to the repair shop.
Replacing Faulty Parts
If tightening connections doesn’t solve the problem, a faulty part might be to blame. Common culprits include worn-out washers or damaged valves.
These parts can wear out over time, especially if your RV has seen a lot of road action. Replacing these parts isn’t as daunting as it sounds.
Identify the faulty component and consult your RV’s manual for replacement instructions. Most hardware stores carry the parts you’ll need, and many RV forums offer helpful advice.
Have you ever changed a light bulb or replaced a car battery? Replacing a washer or valve is just as straightforward.
Taking the plunge can restore your water heater’s efficiency, ensuring hot showers no matter where your adventures take you.
Repairing minor leaks is not just about fixing a problem; it’s about empowering yourself. So, what will you do the next time your RV water heater springs a leak?
Addressing Major Issues
Addressing major issues with your RV water heater can be daunting. Leaks from the bottom often indicate serious problems. Immediate attention is crucial to prevent further damage. Identifying the root cause helps in finding effective solutions.
Dealing With A Cracked Tank
A cracked tank is a common reason for water heater leaks. Inspect the tank for visible cracks or rust. Cracks might be small but can lead to significant leaks. Repairing may require sealants or replacements.
Consider temporary fixes if you’re on the road. Long-term solutions usually involve replacing the tank. Replacement ensures the heater works efficiently without leaks.
Consulting Professional Help
Sometimes, DIY fixes are not enough. Consulting a professional can save time and stress. Experts can diagnose hidden issues accurately. They have tools and experience to handle complex repairs. Hiring a professional often guarantees a longer-lasting solution. This approach also prevents future problems and ensures safety. If unsure, it’s wise to seek expert advice.
Testing The Repair
Experiencing a leak from the bottom of an RV water heater requires quick attention. Identify the source by inspecting connections and seals. Testing the repair involves running the heater to ensure no further leaks occur.
Testing the repair of an RV water heater leak involves careful steps. Ensuring the fix is reliable is crucial for peace of mind. After addressing the leak, verifying the repair is essential. This process includes restoring water supply and monitoring for further leaks. It demands attention and patience.
Restoring Water Supply
Turn the water supply back on slowly. Watch for any signs of leakage. Allow water to flow through the system. This helps detect any remaining issues.
Make sure all connections are secure. Tighten any loose fittings. Check the water heaters temperature settings. Adjust as needed for optimal performance.
Monitoring For Further Leaks
Observe the repaired area closely. Check for drips or moisture. Use a flashlight to inspect hidden spots. Listen for unusual sounds. These can indicate a problem. Leave the heater running for several hours. This helps identify slow leaks. Regularly inspect the water heater over the next few days. Early detection prevents bigger issues.
Preventive Maintenance Tips
Keeping your RV water heater in top shape prevents leaks and costly repairs. A few simple maintenance habits can keep it running smoothly. Regular checks and proper usage can save you from headaches.
Regular Inspections
Inspect your RV water heater monthly. Look for signs of rust or corrosion. Check the connections for tightness. Ensure there are no visible leaks. Listen for strange noises. These can signal a problem. Regular inspections help catch issues early.
Proper Usage Guidelines
Use your RV water heater wisely. Avoid overloading it. Stick to the recommended water temperature. This prevents stress on the heater. Turn it off when not in use. This saves energy and reduces wear. Follow manufacturer instructions closely. Proper usage extends the heater’s lifespan.
Credit: www.youtube.com
Frequently Asked Questions
Why Is My Rv Water Heater Leaking From The Bottom?
A leak at the bottom of your RV water heater may indicate a faulty drain valve or corroded tank. Over time, sediment buildup can cause corrosion, leading to leaks.
Inspect the drain valve for any signs of damage. If corrosion is evident, a professional may need to replace the tank.
How Can I Fix A Leaking Rv Water Heater?
First, turn off the water supply and power to the heater. Check and tighten any loose connections. Replace damaged valves or fittings.
If the leak persists, consider consulting a professional for further diagnosis and repair. Regular maintenance can help prevent future leaks.
Is A Leaking Water Heater Dangerous?
Yes, a leaking water heater can pose risks such as water damage and mold growth. It can also lead to electrical hazards if water comes into contact with electrical components. Address leaks promptly to prevent these dangers and ensure the safety of your RV environment.
Can I Use Sealant On A Leaking Water Heater?
Using sealant can be a temporary fix for minor leaks, but it’s not a permanent solution. Sealants may not withstand the pressure and temperature changes in a water heater. It’s best to identify and repair the root cause of the leak for a long-lasting solution.
Conclusion
Fixing a leaking RV water heater is essential. It prevents bigger issues. Regular checks can catch problems early. Small leaks are easier to manage. They save time and money. Use quality materials for repairs. This ensures longer-lasting solutions. Don’t ignore signs of wear or damage.
Address them promptly. Routine maintenance keeps your RV running smoothly. It also enhances your travel experience. A well-maintained water heater means reliable hot water. This adds comfort to your adventures. Stay proactive. Keep your RV in top shape. Enjoy the journey with peace of mind.