Imagine stepping into your shower, and the water is always just the right temperature, no matter how long you stay. That’s the magic of a Rinnai tankless water heater.
With a steady flow of hot water on demand, it could transform your daily routine. But how do you ensure it’s installed perfectly to reap all the benefits? This guide is crafted just for you. We’ll walk you through the process, highlighting the key steps and expert tips to make your Rinnai tankless water heater installation smooth and successful.
Curious about how this upgrade can enhance your home and save you money? Keep reading, and discover how this innovative system can redefine your comfort and efficiency.
Benefits Of Tankless Water Heaters
Tankless water heaters offer many benefits for homeowners. They provide efficient heating without taking up much space. These heaters ensure you always have hot water available. Let’s explore the key advantages of tankless water heaters.
Energy Efficiency
Tankless water heaters only heat water when needed. This reduces energy consumption. You save money on energy bills. Traditional heaters keep water hot all day. This wastes energy. A tankless system is a greener choice.
Space-saving Design
Tankless units are compact. They fit in small spaces. This frees up room in your home. No large tank needed. Install them on a wall. Perfect for apartments or small homes. Enjoy more living space.
Endless Hot Water Supply
You never run out of hot water. Enjoy long showers. Run multiple appliances at once. The heater provides continuous hot water. Perfect for large families. No waiting for the tank to refill. Always have hot water.
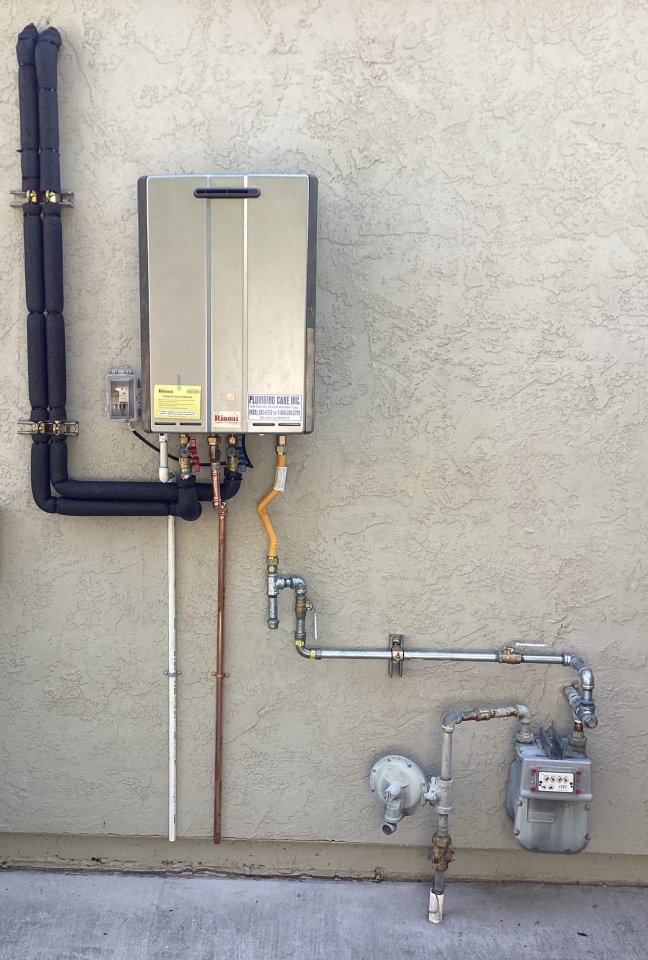
Credit: plumbingcareinc.com
Choosing The Right Rinnai Model
Selecting the best Rinnai tankless water heater ensures efficient installation and long-lasting performance. Consider your home’s water needs and space availability. It’s vital to match the heater’s capacity with your household size.
Choosing the right Rinnai tankless water heater model for your home is essential. It’s not just about picking any unit—it’s about tailoring the choice to your specific needs. This decision can impact your comfort, energy bills, and even the environment. Let’s dive into some key considerations to help you make the best choice.Assessing Household Needs
Start by evaluating your household’s hot water usage. Consider how many people live in your home and their habits. Do you have teens who take long showers or a family member who loves soaking in a bath? Think about the number of appliances that use hot water simultaneously. Dishwashers, washing machines, and showers running at once can strain a water heater. Understanding these needs will guide you in choosing a model with the right capacity.Understanding Capacity And Flow Rate
Capacity and flow rate are crucial factors in selecting a tankless water heater. Capacity refers to the volume of hot water the unit can supply per minute. Flow rate is how quickly this hot water reaches your taps. If you have a large family or multiple bathrooms, you’ll need a model with a higher flow rate. Consider Rinnai’s model options that match your household’s peak hot water demand. For instance, a unit with a flow rate of 9 gallons per minute can efficiently handle multiple outlets simultaneously.Considering Fuel Types
Rinnai offers models that use different fuel sources—natural gas, propane, or electric. Your choice can affect installation costs, efficiency, and long-term savings. Natural gas is often cheaper than electricity and offers efficient heating, making it a popular choice. Propane can be a great alternative if natural gas isn’t available. Reflect on the availability and cost of these fuels in your area. It’s also worth considering environmental impacts. Which fuel type aligns with your sustainability goals? Choosing the right Rinnai model means balancing these factors. It’s not just a purchase; it’s an investment in your home’s comfort and efficiency. What are your top priorities in a water heater?Preparation For Installation
Proper preparation is crucial for a successful Rinnai tankless water heater installation. It ensures efficiency and safety. Follow these steps to make the process smoother and stress-free.
Gathering Necessary Tools
Start by collecting the right tools. A wrench, pipe cutter, and screwdriver are essential. You’ll also need a level and tape measure. Ensure all tools are in good condition. Double-check that you have everything before starting.
Checking Local Codes And Permits
Understanding local codes is vital. Some areas require specific permits for water heater installations. Contact your local authorities for guidelines. Check if any special permissions are needed. This step prevents legal issues later.
Ensuring Proper Ventilation
Proper ventilation is key for safety. Check the installation area for adequate airflow. Rinnai heaters need a venting system. It helps expel gases safely. Verify that vents are clear and unobstructed. This ensures the heater functions properly.
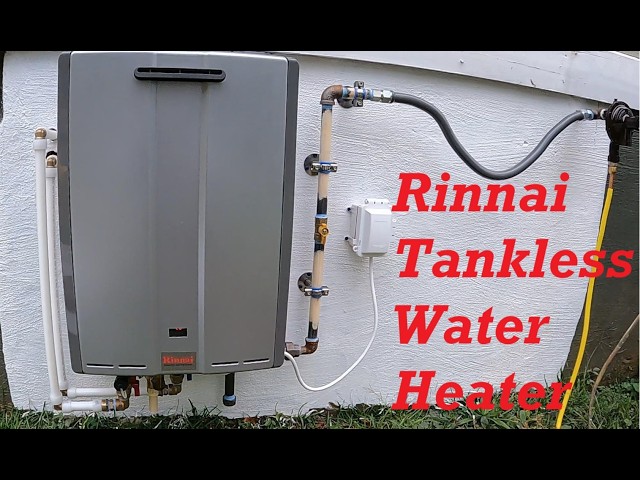
Credit: www.youtube.com
Mounting The Unit
Mount the Rinnai tankless water heater securely on a sturdy surface. Ensure adequate spacing for ventilation and servicing. Proper alignment is key for efficient operation.
Mounting your Rinnai tankless water heater is a crucial step in the installation process. Proper mounting ensures the unit functions efficiently and lasts longer. This part of the installation can seem daunting, but breaking it down into manageable steps makes it straightforward. Let’s delve into the essential steps of selecting a location, securing the mounting bracket, and ensuring accessibility for maintenance.Selecting The Ideal Location
Choosing the right spot for your water heater is more than just finding a convenient wall. You need to consider factors like proximity to water and gas lines. A well-chosen location will minimize heat loss and maximize efficiency. Think about the layout of your home. Where does hot water need to go the fastest? The kitchen or bathroom might be ideal spots. Imagine waking up on a cold morning; you want your shower to heat up quickly. Selecting the right location can make that happen.Securing The Mounting Bracket
Once you’ve identified the perfect spot, it’s time to secure the mounting bracket. This step is all about ensuring your unit stays firmly attached to the wall. It’s like setting the foundation for a house; it needs to be rock-solid. Use the brackets provided with your Rinnai heater. Make sure they’re fastened securely to studs in the wall. This prevents the unit from shifting or falling. A stable mount means fewer vibrations and less noise.Ensuring Accessibility For Maintenance
Accessibility is key for maintenance and repairs. You don’t want to dismantle half your home to fix a heater issue. Plan for easy access to the unit’s components. This means leaving enough space around the heater for a technician to work comfortably. Consider future scenarios: what if you need to replace a part or check a connection? An accessible unit saves time and hassle. Ask yourself, “Can I reach all necessary components without a struggle?” If not, adjust the installation area accordingly. Mounting your unit isn’t just about installation—it’s about planning for a lifetime of efficiency. With the right location, secure mounting, and easy access, you’re setting your Rinnai tankless water heater up for success.Water And Gas Connections
Installing a Rinnai tankless water heater requires careful planning for water and gas connections. Proper placement ensures efficient operation and safety. Professional guidance is recommended for optimal setup and to meet local regulations.
Installing a Rinnai tankless water heater can transform your home’s hot water system by providing endless hot water supply. However, getting it right involves a crucial step: connecting water and gas lines securely and efficiently. This is where precision and attention to detail come into play, ensuring your heater operates safely and effectively.Installing Shut-off Valves
Before you dive into connecting your Rinnai heater, always install shut-off valves for both water and gas lines. Why? These valves allow you to easily stop the flow in case of maintenance or emergencies. Imagine needing to service your heater without these—you’d need to shut off water or gas for your entire home! Position the shut-off valves close to the heater for easy access. This setup will save you time and hassle in the future. Use quality materials to prevent leaks and ensure longevity.Connecting Water Lines
Once your shut-off valves are in place, it’s time to connect the water lines. Begin by attaching the cold water line to the inlet marked on your heater. Make sure all connections are tight to prevent water leaks. Use Teflon tape on threads for a secure seal. Have you ever experienced the frustration of a dripping pipe? A little tape can prevent that hassle. Connect the hot water line to the outlet, and you’re almost set to enjoy a stream of hot water.Hooking Up The Gas Supply
Connecting the gas supply might seem daunting, but it’s simpler than it looks. Ensure your gas line is compatible with your Rinnai model. Double-check that all connections are tight to prevent gas leaks, which can be dangerous. A gas leak detector is an invaluable tool for peace of mind. Place it near the installation area to catch any issues early. Have you thought about the safety measures in your home? This small step can make a big difference. Taking these steps ensures your Rinnai tankless water heater is not just installed but optimized for performance. What could be more satisfying than knowing your home’s hot water system is both efficient and safe?Electrical Setup
The electrical setup of a Rinnai Tankless Water Heater is a critical step in the installation process. Ensuring a safe and efficient electrical connection will not only enhance the performance of the heater but also prolong its lifespan. Let’s break down the key aspects of setting up the electrical components, making sure you’re well-prepared for a seamless installation experience.
Checking Electrical Requirements
Before diving into the wiring, you need to verify the electrical requirements specific to your Rinnai model. Each model may have unique power needs that must be met. Check the manufacturer’s manual for details on voltage and amp requirements.
Consider your current electrical system—does it have the capacity to support the new heater? You might need to upgrade your circuit breaker or add a new dedicated circuit. Ignoring this step could lead to electrical failures or even safety hazards.
Wiring The Unit Safely
Wiring the unit safely is paramount to avoiding electrical mishaps. Ensure the power is turned off at the breaker before starting any wiring work. This simple but crucial step can prevent accidents and injuries.
Use high-quality wiring that matches the specifications in the manual. A personal lesson learned: opting for cheaper materials led to multiple call-backs and frustrations. Invest in the right materials upfront for peace of mind.
Connect the wires following the color codes and instructions in the manual. It’s like assembling a puzzle where each piece has its place. Take your time, and double-check connections to ensure they’re secure.
Testing Power Supply
Once the wiring is complete, it’s time to test the power supply. Turn the breaker back on and check if the unit powers up as expected. If the heater doesn’t start, recheck your connections and ensure everything is securely in place.
Use a multimeter to verify that the correct voltage is being supplied to the unit. This step can save you from future headaches by catching any issues early on. Does everything look good? If yes, you’re ready to enjoy endless hot water!
Remember, a thorough electrical setup is not just a technical task—it’s your ticket to a reliable and efficient hot water supply. What steps will you take to ensure your installation is flawless?
Testing And Adjustments
After installing a Rinnai tankless water heater, testing and adjustments are crucial. These steps ensure the unit operates efficiently and safely. Proper testing avoids potential issues and enhances the heater’s lifespan. Let’s explore key aspects of testing and adjustments.
Inspecting For Leaks
Begin by checking all connections for leaks. Examine the water and gas lines closely. A small leak can lead to bigger problems over time. Tighten any loose fittings promptly. Use a dry cloth to wipe around the connections. This helps detect any moisture signs. A leak-free system ensures safety and efficiency.
Adjusting Temperature Settings
Set the desired water temperature using the control panel. Most people prefer a setting between 120°F and 140°F. This range balances comfort and energy efficiency. Avoid setting temperatures too high. High temperatures increase energy use and pose safety risks. Adjust settings based on your household needs.
Ensuring Optimal Performance
Run the heater for several minutes. Check that hot water flows consistently. Listen for unusual noises during operation. These noises may indicate a problem. Verify the digital display shows accurate temperature readings. Regular performance checks help maintain the heater’s efficiency. Schedule periodic maintenance to keep it running smoothly.
Maintenance Tips
Maintaining your Rinnai tankless water heater is crucial to ensure it performs efficiently for years. Regular upkeep prevents breakdowns and keeps your water heater working smoothly. Here are some essential maintenance tips to consider for your Rinnai tankless water heater.
Regular Descaling And Cleaning
Hard water can lead to mineral buildup in your tankless water heater. This buildup can reduce efficiency and shorten its lifespan. Descaling every six months is a smart move. Use a descaling solution designed for water heaters.
Cleaning the unit is equally important. Dust and debris can accumulate, affecting performance. A gentle wipe-down with a damp cloth can do wonders. This simple step can save you from unexpected repairs.
Monitoring For Wear And Tear
Keep an eye out for any signs of wear and tear. Check the unit’s exterior for rust or leaks. These can indicate underlying issues. Listen for unusual noises from the heater during operation.
If you notice any changes in water temperature or pressure, it might be time for a closer look. Early detection can prevent costly repairs. Remember, being proactive pays off.
Scheduling Professional Inspections
Think about scheduling a professional inspection once a year. Experts can identify problems you might miss. Their trained eye can catch subtle issues before they escalate.
Professionals can also ensure your heater is running at optimal efficiency. This not only extends its lifespan but saves on energy bills. Wouldn’t you want peace of mind knowing your heater is in top shape?
By following these tips, you can ensure your Rinnai tankless water heater serves you well. Regular maintenance keeps it running smoothly, providing you with hot water whenever you need it. What steps will you take to keep your heater in peak condition?
Credit: www.reddit.com
Conclusion
Installing a Rinnai tankless water heater offers many benefits. You enjoy continuous hot water. Space-saving design fits small areas. Energy efficiency saves money over time. Professional installation ensures safety and optimal performance. Consider the long-term savings and comfort. A tankless system is a wise investment.
It meets your home’s hot water needs effectively. Enjoy a reliable hot water source all year round. Make the switch to a tankless system today. Experience convenience and efficiency with Rinnai. Your home deserves the best. Choose wisely for your family’s comfort.