Is your RV hot water heater plug leaking and causing you stress? A small leak might seem harmless at first, but it can quickly turn into a bigger problem that affects your comfort and safety on the road.
You don’t want to deal with unexpected water damage or a cold shower when you least expect it. You’ll discover why this leak happens, how to spot it early, and simple steps you can take to fix it before it gets worse.
Keep reading to protect your RV and enjoy worry-free travels.

Credit: www.youtube.com
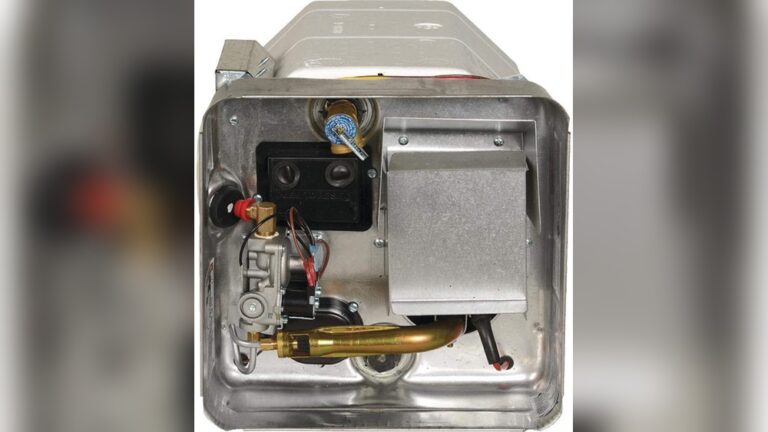
Common Causes Of Leaking Plug
Leaking plugs in RV hot water heaters cause water loss and damage. Understanding common causes helps fix the problem fast. Many leaks come from simple issues that anyone can check. This saves time and money on repairs. Below are frequent reasons why the plug might leak.
Worn Out Washer
The washer seals the plug to stop water leaks. Over time, heat and water wear it down. A worn washer becomes thin, cracked, or brittle. This lets water drip around the plug. Replacing the washer often stops the leak quickly.
Loose Or Damaged Plug
If the plug is not tight, water can escape. Vibration from travel can loosen it over time. Also, a damaged plug may not fit correctly. Check the plug for cracks or stripped threads. Tightening or swapping it out can fix leaks.
Corroded Threads
Corrosion builds up on metal threads inside the heater. This makes it hard to seal the plug tightly. Rust can eat away the metal, causing gaps. Cleaning or replacing corroded parts prevents leaks and damage.
Excessive Pressure Build-up
Too much pressure inside the heater forces water out the plug. This happens if the pressure relief valve fails. High pressure strains the plug and seals. Checking the valve and pressure helps avoid leaks and keeps the heater safe.
Tools And Materials Needed
Fixing an RV hot water heater plug leak needs the right tools and materials. Having these ready makes the job easier and faster. This section lists what you need to gather before starting the repair.
Basic Hand Tools
Start with simple hand tools. A wrench or adjustable spanner helps loosen the plug. Screwdrivers may be needed for removing covers or panels. A small brush cleans dirt around the plug area. These tools help you access and remove the leaking plug safely.
Replacement Washers And Plugs
Old washers and plugs often cause leaks. Bring new washers that fit your heater model. Replacement plugs ensure a tight seal after repair. Using the correct size parts prevents future leaks and keeps water inside the heater.
Sealant And Teflon Tape
Sealant or plumber’s putty stops water from seeping through threads. Wrap Teflon tape around plug threads before installation. This creates a waterproof barrier. Both sealant and tape improve the plug’s grip and stop leaks effectively.
Safety Gear
Wear gloves to protect your hands from hot water and sharp edges. Safety goggles shield your eyes from splashes or debris. Proper safety gear keeps you safe during the repair process.
Step-by-step Fixes
Fixing an RV hot water heater plug leak is a task many owners can do themselves. This guide breaks down the process into clear, easy steps. Each step helps stop the leak and keeps your water heater working well.
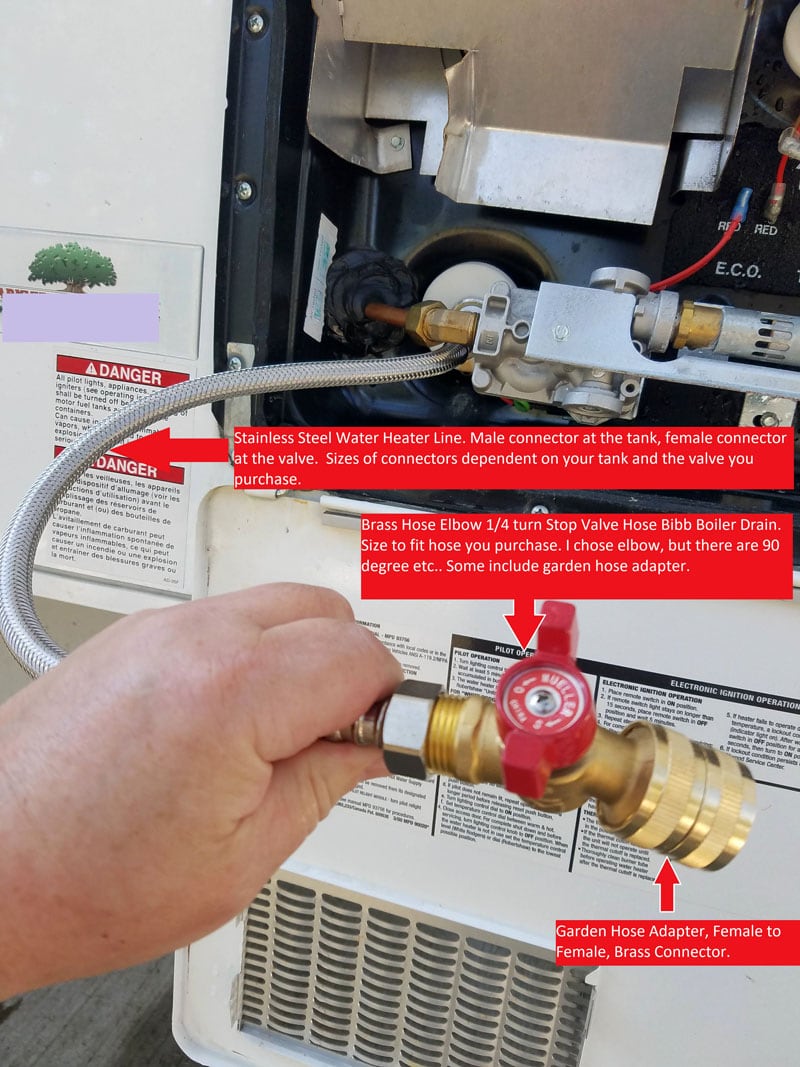
Turning Off The Water Heater
Start by turning off the power or gas supply to the water heater. This step is important for safety. Then, shut off the water supply to prevent new water from entering the tank.
Draining The Water Tank
Locate the drain valve at the bottom of the tank. Open the valve and let all the water flow out. Use a bucket or hose to direct the water away from your RV.
Removing The Leaking Plug
Use a wrench to carefully unscrew the leaking plug. Turn it counterclockwise until it comes free. Keep the plug safe for inspection and cleaning.
Inspecting And Replacing The Washer
Check the washer inside the plug for cracks or damage. A worn washer often causes leaks. Replace it with a new one of the same size and type.
Cleaning And Sealing Threads
Clean the plug threads and the tank opening with a cloth. Remove dirt and old sealant. Apply plumber’s tape or thread sealant to the plug threads for a tight seal.
Reinstalling The Plug
Carefully screw the plug back into the tank opening. Turn it clockwise by hand at first, then tighten it with a wrench. Avoid overtightening to prevent damage.
Testing For Leaks
Turn the water supply back on slowly. Check around the plug for any water drips. If no leaks appear, restore power or gas to the heater and test it fully.

Credit: salubrista.udea.edu.co
Preventive Maintenance Tips
Preventive maintenance helps avoid leaks in your RV hot water heater plug. Small checks and care stop big problems. Regular attention keeps your water heater safe and working well. Follow these simple tips to protect your RV’s hot water system.
Regular Inspection Schedule
Check your hot water heater plug every month. Look for cracks, rust, or moisture around the plug. Tighten any loose parts carefully. Early spotting of issues stops leaks before they start. Keep a log of your inspections for best results.
Proper Water Pressure Management
Keep water pressure within the recommended range. High pressure causes stress on the heater plug and seals. Use a pressure regulator if needed. Too much pressure can lead to leaks and damage. Monitor pressure regularly to ensure safe levels.
Using Quality Replacement Parts
Always use good quality parts for repairs. Cheap parts wear out fast and cause leaks. Buy parts designed specifically for your RV model. Proper fitting parts ensure a tight seal. This reduces the chance of hot water escaping.
Winterizing Your Rv Water Heater
Drain your water heater before cold weather arrives. Remove all water to stop freezing and cracking. Use RV antifreeze to protect pipes and plugs. Follow your RV manual for winterizing steps. This keeps your water heater safe through winter months.
When To Call A Professional
Knowing when to call a professional for your RV hot water heater plug leaking saves time and money. Some problems need expert skills and tools to fix safely. Ignoring serious issues can cause more damage to your RV’s plumbing system.
Persistent Leaks After Fixes
Leaks that continue after your attempts to fix them need a professional check. A small drip might hide a larger problem inside the heater. Experts can find hard-to-see leaks and fix them properly.
Complex Plumbing Issues
Some leaks come from complicated plumbing parts you cannot reach easily. Twisted pipes, faulty seals, or broken fittings need special tools. Professionals know how to handle these tricky problems safely.
Water Heater Malfunctions
If the hot water heater does not heat water or makes strange noises, call a pro. Malfunctions can cause leaks and damage the heater further. A technician can diagnose and repair these problems correctly.
Credit: salubrista.udea.edu.co
Conclusion
A leaking RV hot water heater plug can cause big problems. Fixing the leak quickly saves water and prevents damage. Check the plug often to spot leaks early. Tighten or replace the plug if needed. Small efforts keep your RV running smoothly.
Stay alert and act fast to avoid costly repairs. Taking care of your heater ensures warm water on every trip. Simple steps make a big difference in your RV life.