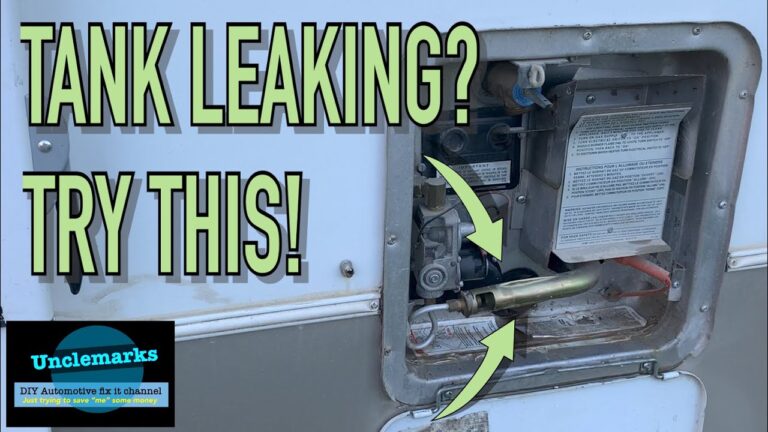
Is your RV tankless water heater leaking? That can be frustrating—and it might even ruin your trip.
You rely on your water heater for hot showers and comfort, so a leak is more than just an inconvenience. But don’t worry. You’ll discover why your tankless water heater might be leaking, how to spot the problem early, and simple steps you can take to fix it before it gets worse.
Keep reading to protect your RV and enjoy warm water without stress.

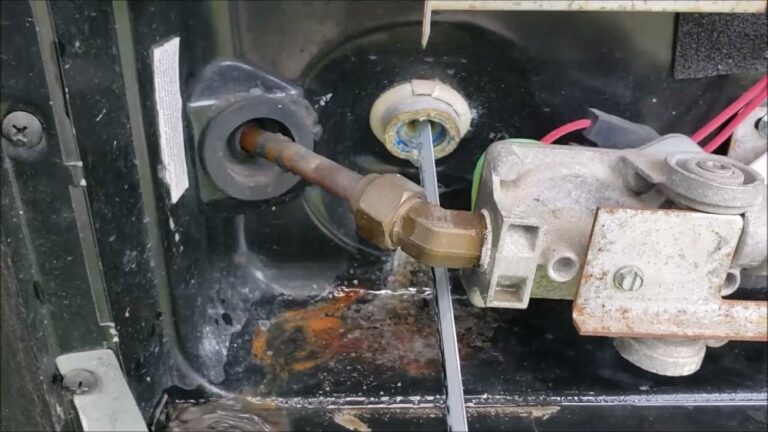
Credit: www.reddit.com
Common Causes Of Leaks
Leaks in an RV tankless water heater cause many problems. They waste water and can damage your RV. Finding the cause of the leak is important. Many leaks come from common issues that are easy to fix.
Loose Connections
Loose connections often cause leaks in tankless water heaters. Pipes and fittings may not be tight enough. Vibration from driving can loosen these parts. Check all connections and tighten them carefully. This can stop most leaks quickly.
Damaged Seals
Seals keep water inside the heater. Over time, seals can crack or wear out. Heat and water pressure damage them. Damaged seals let water escape and cause leaks. Replace any worn seals to keep your heater working well.
Corroded Pipes
Corrosion weakens pipes and causes leaks. Water and metal react, creating rust. Rust eats holes in the pipes. Check pipes for rust spots or discoloration. Replace corroded pipes before leaks start.
Faulty Valves
Valves control water flow in the heater. Faulty or broken valves can leak water. This happens if valves do not close properly. Test all valves and replace any that leak. Proper valve function stops water loss and damage.

Credit: www.olivelaneeventdecor.co.za
Identifying The Leak Source
Finding the source of a leak in an RV tankless water heater is crucial. It helps stop water damage and saves repair costs. Start with a careful check. Small leaks can cause big problems over time.
Visual Inspection
Look closely at the water heater and pipes. Notice any wet spots or rust. Check around connections and fittings. Cracks or corrosion often cause leaks. Use a flashlight for dark areas. Even tiny drops show where water escapes.
Listening For Drips
Quiet places help hear water dripping. Hold your ear near the water heater. Listen for soft dripping or hissing sounds. These sounds point to leaks not seen easily. Checking at night or early morning works best.
Checking Water Pressure
Low water pressure may mean a leak. Use a pressure gauge on the water line. Watch for pressure drops when the heater is off. Sudden drops mean water escapes somewhere. Track pressure changes to find the leak spot.
Using Leak Detection Tools
Tools like moisture meters or infrared cameras help find leaks. Moisture meters measure wetness inside walls or floors. Infrared cameras show temperature changes caused by water. These tools find hidden leaks fast. Renting or buying them aids in quick repairs.
Quick Fixes For Loose Connections
Loose connections often cause leaks in RV tankless water heaters. Fixing these quickly stops water damage and restores proper function. Simple steps like tightening fittings or replacing seal tape work well. Securing hose clamps ensures no water escapes. These quick fixes save time and money. Anyone can do them with basic tools and little experience.
Tightening Fittings
Check all pipe and valve fittings for looseness. Use a wrench to gently tighten them. Avoid over-tightening to prevent damage. Tight fittings stop water from leaking out. Inspect fittings regularly to catch issues early. Tightening is often the fastest fix for leaks.
Replacing Thread Seal Tape
Thread seal tape helps create a watertight seal on pipe threads. Remove old tape from connections. Wrap new tape around threads clockwise, covering them evenly. Reconnect the fittings and tighten securely. Fresh tape fills gaps and stops leaks. This fix is cheap and effective for many leaks.
Securing Hose Clamps
Hose clamps hold hoses tightly in place. Check clamps for looseness or rust. Use a screwdriver to tighten them firmly. Replace damaged clamps with new ones. Properly secured clamps prevent water from dripping. Regular clamp checks help keep your heater leak-free.
Repairing Damaged Seals
Repairing damaged seals in an RV tankless water heater is crucial to stop leaks. Seals keep water from escaping and maintain pressure inside the system. Over time, these seals wear out or crack, causing water to leak. Fixing them quickly prevents bigger problems and saves money.
Removing Old Seals
Start by turning off the water and power supply. Drain any water left in the heater to avoid spills. Use a small tool to gently lift and remove the old seals. Clean the area around the seal to remove dirt and residue. Make sure no pieces of the old seal stay behind.
Selecting Replacement Seals
Choose seals that fit your water heater model exactly. Check the size and material type before buying. Rubber seals often work best for tankless water heaters. Using the right seal prevents leaks and ensures a tight fit. Avoid cheap or generic seals that may fail quickly.
Proper Seal Installation
Place the new seal carefully in the seal groove. Press it down evenly to avoid gaps or twists. Use a small amount of silicone lubricant to help the seal fit well. Tighten any parts around the seal as needed. Test the heater for leaks before full use.
Handling Corroded Pipes
Corroded pipes cause leaks in an RV tankless water heater. Rust and buildup weaken the metal. This leads to water dripping or spraying out. Fixing corroded pipes helps stop leaks and protects your water heater. It also keeps your water clean and safe.
Handling corrosion takes care and the right tools. You can clean, seal, or replace pipes. Each step helps keep your system strong and leak-free. Learn how to manage corroded pipes below.
Cleaning Corrosion
Start by removing rust and buildup from pipes. Use a wire brush or sandpaper. Clean both inside and outside of the pipe. Wipe the pipe with a damp cloth after scrubbing. This clears debris that blocks water flow. Clean pipes help prevent leaks and keep water pure.
Using Pipe Sealant
Apply pipe sealant on cleaned pipes to stop leaks. Choose a sealant made for metal pipes and water heaters. Spread a thin layer over joints and cracks. Sealants fill small holes and prevent water from escaping. Let the sealant dry fully before using the heater again.
When To Replace Pipes
Replace pipes if corrosion is severe or pipes are weak. Look for holes, deep rust, or metal flaking. Pipes that crumble or break need changing. Use new pipes that fit your water heater model. Fresh pipes stop leaks and improve water flow.
Fixing Faulty Valves
Fixing faulty valves in an RV tankless water heater is key to stopping leaks. Valves control water flow and pressure. If they fail, water can drip or spray out. This wastes water and may cause damage. Knowing how to test, replace, and maintain valves helps keep your heater working well.
Testing Valve Function
Start by turning off the water supply. Check the valve handle for smooth movement. Open and close the valve slowly. Listen for unusual sounds like hissing or dripping. Use a pressure gauge to measure if the valve holds steady pressure. Any leaks or pressure drops mean the valve is faulty.
Replacing Valve Components
Gather tools like wrenches and screwdrivers before starting. Remove the valve cover carefully. Inspect internal parts for cracks or wear. Replace seals, washers, or the whole valve if needed. Tighten all connections firmly but avoid overtightening. Test the water heater after replacement for leaks or issues.
Valve Maintenance Tips
Clean valves regularly to stop dirt buildup. Use a soft brush or cloth to wipe parts. Avoid harsh chemicals that damage valve materials. Check valves every few months to catch problems early. Lubricate moving parts with manufacturer-approved oil. Proper care extends valve life and prevents leaks.
Preventive Maintenance Tips
Preventive maintenance keeps your RV tankless water heater working well. It helps avoid leaks and costly repairs. Simple steps can extend the heater’s life and keep hot water flowing.
Regular Inspections
Check your water heater often for signs of wear or damage. Look for small leaks or rust around pipes and connections. Tighten loose fittings to stop drips. Early spotting of problems saves big trouble later.
Flushing The Heater
Flush the system to clear out mineral buildup inside the heater. Minerals can block pipes and cause leaks. Use a descaling solution every few months. This keeps the heater clean and working at full power.
Winterizing The System
Prepare your heater before cold weather to prevent freezing damage. Drain all water from the system. Add antifreeze made for RV water heaters. This step stops cracks and leaks during winter.

Credit: www.icecreamfactoryny.com
When To Call A Professional
Knowing when to call a professional for an RV tankless water heater leak is important. Some problems look small but can cause big damage. Quick action can save your heater and avoid extra costs. Here are signs that show it is time to get expert help.
Signs Of Serious Damage
Water pooling around the heater is a clear warning. Rust or corrosion on pipes means leaks have lasted long. Strange noises or a drop in water pressure also signal trouble. Cracks or holes in the heater body need urgent attention.
Complex Repairs
Fixing a tankless water heater is not always simple. Some leaks come from deep inside the unit or hidden pipes. Repairs may require special tools or parts. Professionals know how to find and fix these hard-to-see leaks fast.
Safety Considerations
Water heaters use gas or electricity, which can be dangerous. Leaks can cause short circuits or gas leaks. Handling these risks needs skill and care. Calling a professional keeps you safe and avoids accidents.
Frequently Asked Questions
Why Is My Rv Tankless Water Heater Leaking?
Leaks often result from loose connections, damaged seals, or corrosion. Inspect fittings and hoses regularly. Tighten connections and replace faulty parts promptly to prevent water damage.
How Can I Fix A Leaking Rv Tankless Water Heater?
Turn off power and water supply first. Tighten loose fittings or replace worn-out seals. If corrosion or cracks exist, consider professional repair or unit replacement.
Is A Leaking Rv Tankless Water Heater Dangerous?
Yes, leaks can cause water damage and electrical hazards. Promptly address leaks to avoid mold growth, structural damage, and potential fire risks from electrical shorts.
How Do I Prevent Leaks In My Rv Tankless Water Heater?
Regularly inspect connections and seals for wear. Perform routine maintenance, including flushing the system to remove mineral buildup. Use quality parts for replacements to ensure durability.
Conclusion
A leaking RV tankless water heater can cause many problems. Fixing leaks early saves money and stress. Check seals and connections often for any signs of water. Regular care keeps your heater working well on the road. Don’t ignore small drips; they can turn into big leaks fast.
Keep your RV comfortable with a dry, warm water system. Simple steps help avoid costly repairs later. Stay safe and enjoy your travels without water troubles.