Is your water heater acting up or leaking? One common culprit might be your pressure relief valve.
Knowing how to change your water heater pressure relief valve can save you from costly repairs and keep your home safe. In this guide, you’ll learn simple, clear steps to replace this important part quickly and confidently—even if you’ve never done it before.
Keep reading to protect your water heater and avoid future headaches.

Credit: smcontinental.com
Signs Of A Faulty Valve
Understanding the signs of a faulty water heater pressure relief valve helps prevent serious damage. This valve keeps your water heater safe by releasing extra pressure. When it stops working, problems can arise quickly. Watch for clear signs that tell you the valve needs attention.
Leaking Water
Water dripping from the valve or around the tank indicates a leak. A small leak can turn into a big problem fast. Constant leaking means the valve may not close properly. Check for wet spots near the heater regularly.
Frequent Pressure Build-up
Pressure that rises too often shows the valve might fail. This causes the water heater to feel hot or noisy. High pressure can damage pipes and the tank itself. A working valve should release pressure safely and quietly.
Noisy Operation
Strange sounds like hissing or popping near the valve are warning signs. These noises mean the valve is under stress. Noise may also come from trapped air or pressure surges. Listening closely helps catch problems early.
Tools And Materials Needed
Changing a water heater pressure relief valve needs the right tools and materials. Having these ready helps the job go smoothly. It saves time and avoids mistakes. Prepare all items before starting work.
Replacement Valve
Choose a new pressure relief valve that fits your water heater. Check the size and pressure rating on the old valve. Buy a high-quality valve for safety and durability. Never reuse an old valve for replacement.
Wrenches And Screwdrivers
Use an adjustable wrench to loosen and tighten the valve. A pipe wrench may be needed for tight fittings. Keep a flathead or Phillips screwdriver handy for any screws. Having the right tools prevents damage during removal and installation.
Teflon Tape And Bucket
Wrap Teflon tape on the valve threads to stop leaks. Use several layers for a tight seal. Place a bucket under the valve to catch water spills. This keeps the work area clean and dry.
Preparing For The Replacement
Preparing for the replacement of your water heater pressure relief valve is a key step. It ensures the process goes smoothly and safely. Taking time to prepare helps avoid damage and injury. Follow these simple steps before you start the replacement.
Turn Off Power And Water
First, switch off the power to the water heater. For electric heaters, turn off the breaker at the main panel. For gas heaters, set the gas valve to the off position. Next, shut off the water supply to the heater. This stops water flow and prevents leaks during the work.
Drain The Water Heater
Drain some water from the tank to lower pressure. Attach a garden hose to the drain valve at the bottom. Run the hose to a safe drainage area. Open the valve slowly and let water flow out. Draining reduces the risk of hot water spraying out during the valve removal.
Ensure Safety Precautions
Wear safety gloves and goggles to protect yourself. Make sure the area around the heater is dry and clear. Keep children and pets away from the work zone. Double-check that power and water are off before proceeding. Safety first. It makes the job easier and safer for you.
Removing The Old Valve
Removing the old pressure relief valve is the first step in replacing it safely. The valve controls water pressure and releases excess pressure to prevent damage. Proper removal ensures no leaks or damage to your water heater. Follow these simple steps carefully to remove the old valve without trouble.
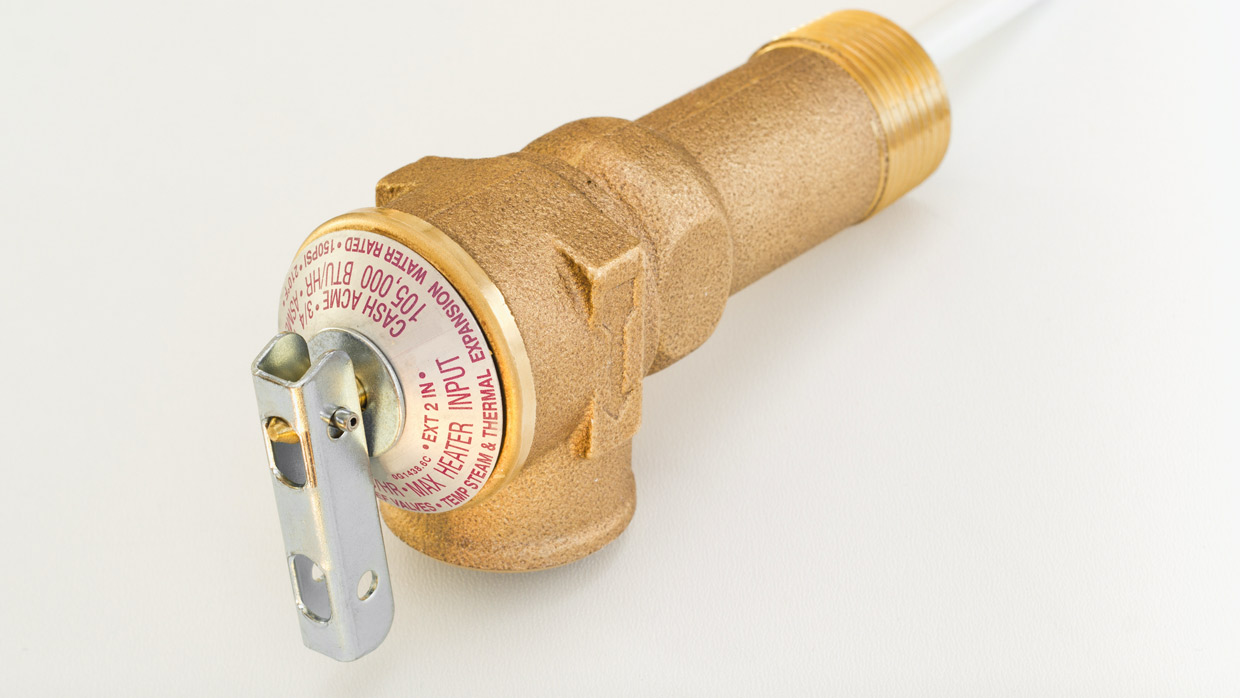
Locate The Pressure Relief Valve
Find the valve on the side or top of the water heater tank. It looks like a small pipe with a lever or handle. The valve is often near the cold water inlet. Make sure the water heater is off and cooled down before touching the valve.
Loosen And Remove Valve
Use a wrench to turn the valve counterclockwise. Turn slowly to avoid damaging the tank threads. Water may leak out, so have a bucket or towel ready. Once loose, remove the valve by hand. Check the valve for any stuck parts and remove them carefully.
Inspect Valve Opening
Look inside the valve opening for debris or corrosion. Clean the area with a cloth if needed. Check the threads for damage or rust. A clean, smooth opening helps the new valve fit properly. If the opening looks damaged, call a professional for help.
Installing The New Valve
Installing the new water heater pressure relief valve requires care and attention. This step ensures your water heater works safely and efficiently. Follow these simple actions to place the new valve correctly.
Apply Teflon Tape
Start by wrapping Teflon tape around the valve threads. Wrap it clockwise to match the thread direction. This prevents leaks by sealing the connection tightly. Two to three layers of tape are enough for a good seal.
Screw In The New Valve
Carefully screw the new valve into the water heater’s valve opening. Turn it by hand at first to avoid cross-threading. Make sure it fits snugly and aligns properly with the pipe.
Tighten Securely
Use a wrench to tighten the valve firmly but gently. Avoid overtightening to prevent damage to the valve or pipe. The valve should feel secure without wobbling or gaps.
Testing The New Valve
Testing the new pressure relief valve is a key step after installation. It ensures your water heater works safely and properly. This process confirms the valve releases pressure correctly and prevents damage.
Restore Water Supply
First, open the main water valve to fill the tank. Let water flow until the tank is full. Watch for any unusual sounds or slow filling. This step prepares the system for pressure testing.
Check For Leaks
Inspect the new valve and pipe joints carefully. Look closely for water dripping or moisture. Even small leaks need fixing to avoid bigger problems. Tighten connections if needed and test again.
Turn On Power And Monitor
Switch on the heater’s power or gas supply. Allow the water to heat while watching the valve. The valve should not release water unless pressure is too high. Keep monitoring for at least 30 minutes.
Maintenance Tips
Maintaining your water heater pressure relief valve is key for safety and efficiency. Simple steps help avoid leaks and damage. Regular care keeps your water heater working well.
Regular Valve Inspection
Check the valve every six months. Look for rust, corrosion, or leaks. Lift the valve handle to test if water flows out. Release the handle slowly. If water does not flow, the valve may need repair or replacement.
Flushing The Water Heater
Flush the water heater once a year. This removes sediment that can build up inside. Attach a hose to the drain valve and drain the tank. Flushing helps the pressure valve work better and lasts longer.
When To Replace The Valve
Replace the valve if it leaks constantly or does not open. Also, change it if it shows heavy rust or damage. Always use a valve that matches your water heater’s model. A faulty valve can cause pressure build-up and risks.

Credit: www.youtube.com
Credit: www.wagnermechanical.com
Conclusion
Changing a water heater pressure relief valve keeps your system safe and working well. Take your time and follow each step carefully. Always turn off the water and power before starting. Use the right tools to avoid damage. Check the new valve for leaks after installation.
Regular maintenance helps prevent big problems later. Stay safe and keep your home comfortable. Simple steps like these make a big difference.